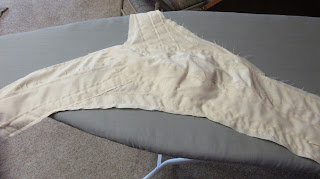
Bandaged Bandeau/Bra
I needed something to work as a bra/undershirt for a costume
that would match the costume itself, but I also needed something that would
offer some support. I was wanting to dress up as a female pirate. The shirt I
have is definitely screams pirate or brigand, but to wear an undershirt
underneath would just look tacky. So I created something that would have the
bandage look but still offer enough support so I would feel comfortable.
You will need enough fabric to fit around your chest area
plus enough fabric to cut into strips for the bandaged look.
The fabric I used was actually left-over from a Toph
costume. It was an old tablecloth that I found at a thrift store.
You will also need basic sewing materials such as a sewing
machine, pins, scissors, measuring tape, and tracing pencil.
I fastened mine with a zipper in the back. But you can use
bra clasps or elastic fabric.
You may also want bra cups if you have a larger bust. I
almost put some in, but I am small enough it looked alright.
To create the pattern, you will need cling wrap and masking
tape or duct tape.
*A buddy would be helpful too
*I prefer the masking tape
*A buddy would be helpful too
*I prefer the masking tape
Step 2: Making the
pattern
*This became a difficult task because I did it all by
myself. You can do it alone if you wish, but I recommend a close friend to
help.
First, take the cling wrap and wrap around your chest and
any of the areas that you want fabric to be eventually. Leave some extra too.
Second, wrap around and around with the masking tape till
you have everywhere covered to create your pattern. If you applied too much
tape that’s OKAY. Just grab a marker and mark off the section.
Third, once it looks sort of how you want the finished
product to look like, cut it off. I cut mine in the back because that was where
I wanted my zipper (which was once again very difficult because I did it by
myself).
Here is what I have so far. I have created my “pattern” and
cut if from my body.

Next cut off any excess cling wrap and tape. Make it as
close as you can to how you want it to look in the end.
Next you get to cut up what you have so far. The goal is to
get it to lay flat. You will need that extra room for your bust, therefore you
can’t have just one piece of fabric. I cut mine into three pieces.
I cut off the strap first.
Then I cut the main chest piece in half where it came to the
highest peak.
*Strap is not shown in this picture

Next just find some big heavy books and flatten your
pattern.
Step 3: Cutting out
the pattern
 While your pattern is flattening, iron out the fabric you
are using and trim any edges that might be frayed.
When your pattern pieces are flat lay them out on your
fabric and trace them.

Then add a seam allowance. I used 1/4in.
I then cut the everything out on the dotted line.
Step 4: Putting it
together
*Since my bottom chest piece is curved, I had to cut a few slits while sewing the seam allowance.
Next I sewed all the pieces together except in the back
where my strap will connect and where the zipper will go.
*Now would be the time to add the bra cups if you are using
any
I was looking for the bandaged rustic look. Sort of like
Erza from Fairy Tail’s Samaria top.

Cut a bunch of strips from your fabric, some bigger and some smaller.
*You won’t know how many you will need till you are done. So I cut some more as I went
I started on the strap. I laid some of the strips down and
figured out about how I wanted it to look.
*Since I am on the strap I didn’t sew into the chest area, because I know I
will be putting more layers over that area.

*I pinned the strip down that I was sewing as well. Here is an example.
Here are all the strips sewed onto the strap.
Then I trimmed all of the ends off so that they were
straight.
Continue this process till you have covered the whole thing.
Step 6: The zipper
First trim the ends so that all the strips are straight with
the original piece.

I then folded it over so that it would have a 1/2in seam
allowance and ironed it.
*I used an old jacket zipper. Since it was plastic I could
just cut it with scissors. I then used some extra fabric and sewed it onto the
end of the zipper so it would not slide off.
Unzip the zipper and pin it to each side. Then sew. It
should look something like this.

Step 6: The strap
Put on the bralette and have a trusted friend line it up
where it should go on the back. Either have them mark it with a pencil or pin
it.
Then sew that strap on!
Optional Step…
So after wearing my bralette all day at a festival I
realized It was quite difficult to breath in because it didn’t have any give
way on my ribcage. I would suggest adding some thick elastic to the bottom.


No comments:
Post a Comment